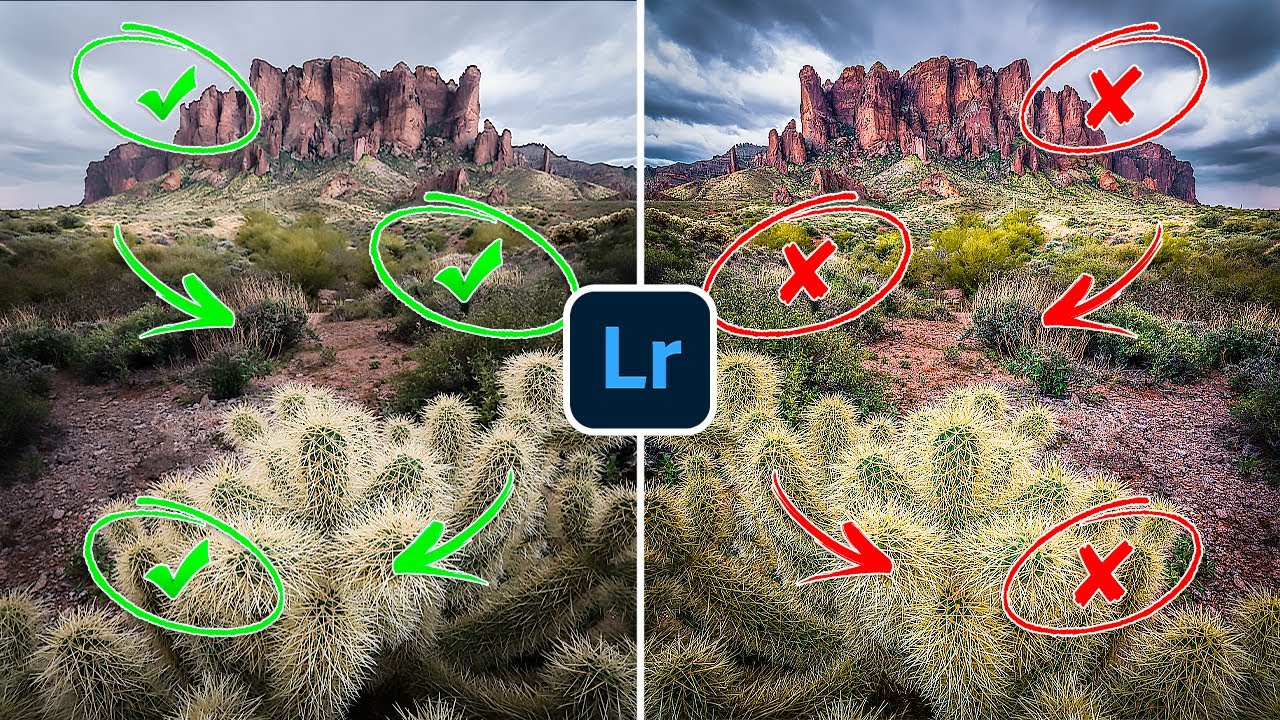
I spent years thinking more was more. More contrast, more saturation, more drama pulled out of every shadow. After two decades behind a camera in the high desert outside Bend, I can look back at my early edits and wince at them the way you wince at a haircut from an old photo. The problem was never enthusiasm. The problem was I didn’t have a clear checklist of what to look for. When you’re deep in a Lightroom session at midnight, you lose your calibration. Everything starts looking normal that isn’t.
Watch the full tutorial on YouTube
That’s exactly the gap this Mark Denney tutorial fills. Denney went back through years of his own archive specifically to identify what over-processing actually looks like in practice, and he came away with six concrete signs. What I appreciate about his approach is that he doesn’t just name the problems. He walks through the fix for each one, with real sliders and real images. I’ve been pointing students in my workshops toward this kind of diagnostic thinking for years, and this video does it better than most written guides manage to.
The walkthrough below covers the first sign Denney demonstrates in depth, the one he calls “detailed highlights,” because it’s the most instructive and the most common. If this one resonates, the full video covers five more worth your time.
Step 1: Identify the Over-Recovered Sky
 Overexposed sky with blown highlights in landscape photo
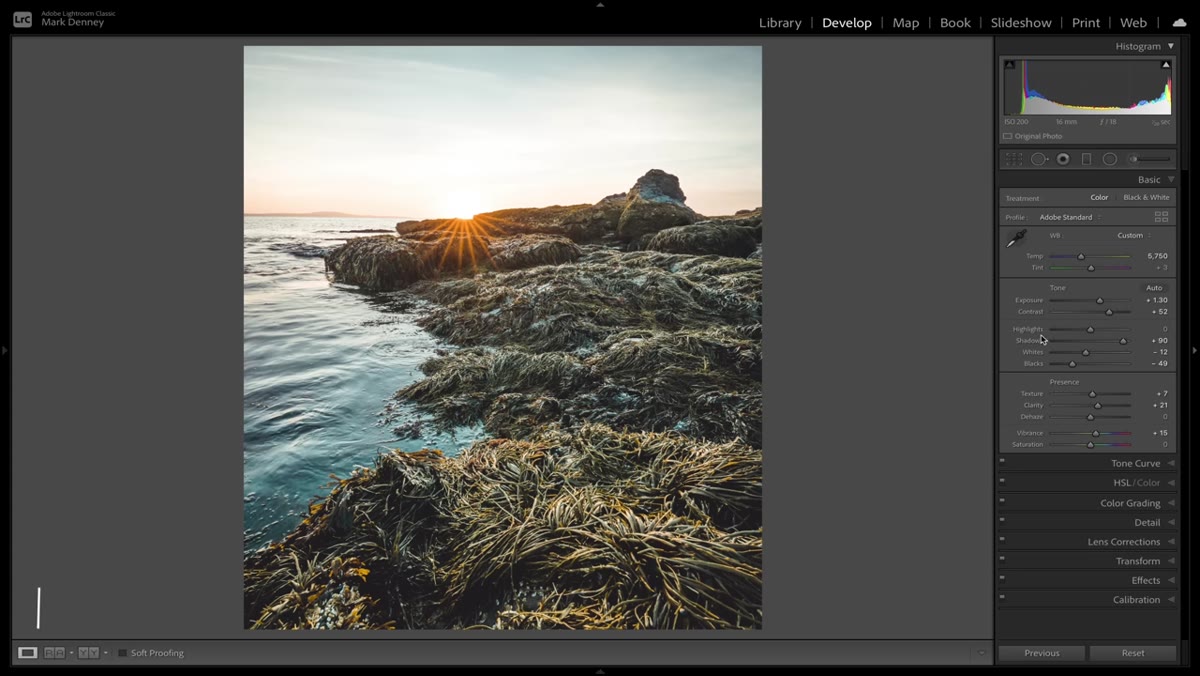
The first thing to look for is a sky that’s technically recovered but visually wrong. Pull your highlight slider all the way to -100 and study the result carefully. The broad sky may look better. Clouds might reappear. But look at the sun itself, or any bright point source in the frame. If it looks flat, gray, or like a coin pressed into the sky rather than a glowing source of light, you’ve pushed too hard. Denney demonstrates this clearly by toggling the highlights on and off, and the difference in the sun’s appearance is stark. Recovery is not restoration. Sometimes you’re recovering texture where none should exist.
Overexposed sky with blown highlights in landscape photo
The first thing to look for is a sky that’s technically recovered but visually wrong. Pull your highlight slider all the way to -100 and study the result carefully. The broad sky may look better. Clouds might reappear. But look at the sun itself, or any bright point source in the frame. If it looks flat, gray, or like a coin pressed into the sky rather than a glowing source of light, you’ve pushed too hard. Denney demonstrates this clearly by toggling the highlights on and off, and the difference in the sun’s appearance is stark. Recovery is not restoration. Sometimes you’re recovering texture where none should exist.
Step 2: Recognize the Trade-Off Between Recovery and Realism
 Highlights slider at -100 showing flat sun vs. natural glow
Here’s the tension that trips up most photographers at this stage. Pulling highlights down hard does exactly what it promises in the areas where detail needs to be pulled back. The problem is that it applies uniformly. The algorithm doesn’t know your sun is supposed to glow. It just sees bright values and flattens them. So when you recover the sky, you also accidentally drain the luminous quality out of the brightest part of the scene, which is usually the most emotionally important part. The fix isn’t to stop using highlight recovery. It’s to stop letting it do all the work everywhere.
Highlights slider at -100 showing flat sun vs. natural glow
Here’s the tension that trips up most photographers at this stage. Pulling highlights down hard does exactly what it promises in the areas where detail needs to be pulled back. The problem is that it applies uniformly. The algorithm doesn’t know your sun is supposed to glow. It just sees bright values and flattens them. So when you recover the sky, you also accidentally drain the luminous quality out of the brightest part of the scene, which is usually the most emotionally important part. The fix isn’t to stop using highlight recovery. It’s to stop letting it do all the work everywhere.
Step 3: Draw a Radial Filter Over the Sun
 Radial filter drawn as small oval centered on sun
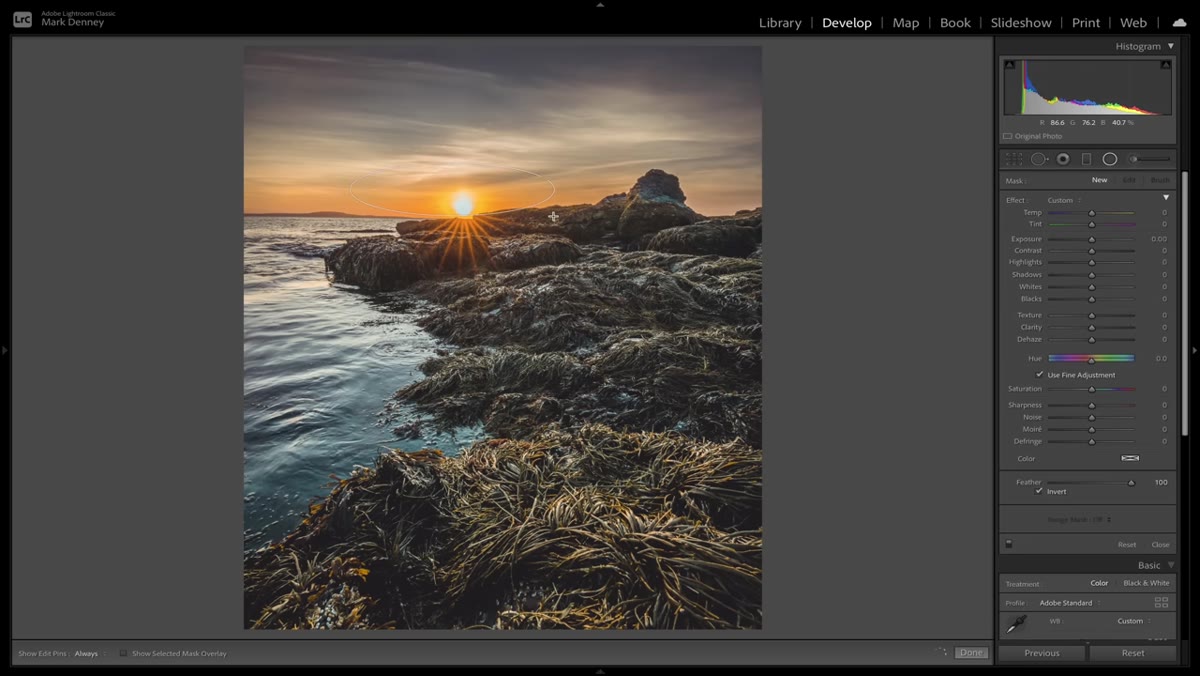
With highlights still at -100, go to the Radial Filter tool in Lightroom and draw a small oval directly over the sun. Keep it tight to the source, not sprawling across half the sky. This isolates the correction you’re about to make to just that zone. Critically, set the feather to 100. You want the edge of this adjustment to bleed out gradually so there’s no visible boundary where your correction ends. A hard-edged radial filter in a sky looks like a mistake, because it is. The goal is a transition so smooth the viewer never suspects it happened.
Radial filter drawn as small oval centered on sun
With highlights still at -100, go to the Radial Filter tool in Lightroom and draw a small oval directly over the sun. Keep it tight to the source, not sprawling across half the sky. This isolates the correction you’re about to make to just that zone. Critically, set the feather to 100. You want the edge of this adjustment to bleed out gradually so there’s no visible boundary where your correction ends. A hard-edged radial filter in a sky looks like a mistake, because it is. The goal is a transition so smooth the viewer never suspects it happened.
Step 4: Apply Negative Dehaze to Soften the Sun
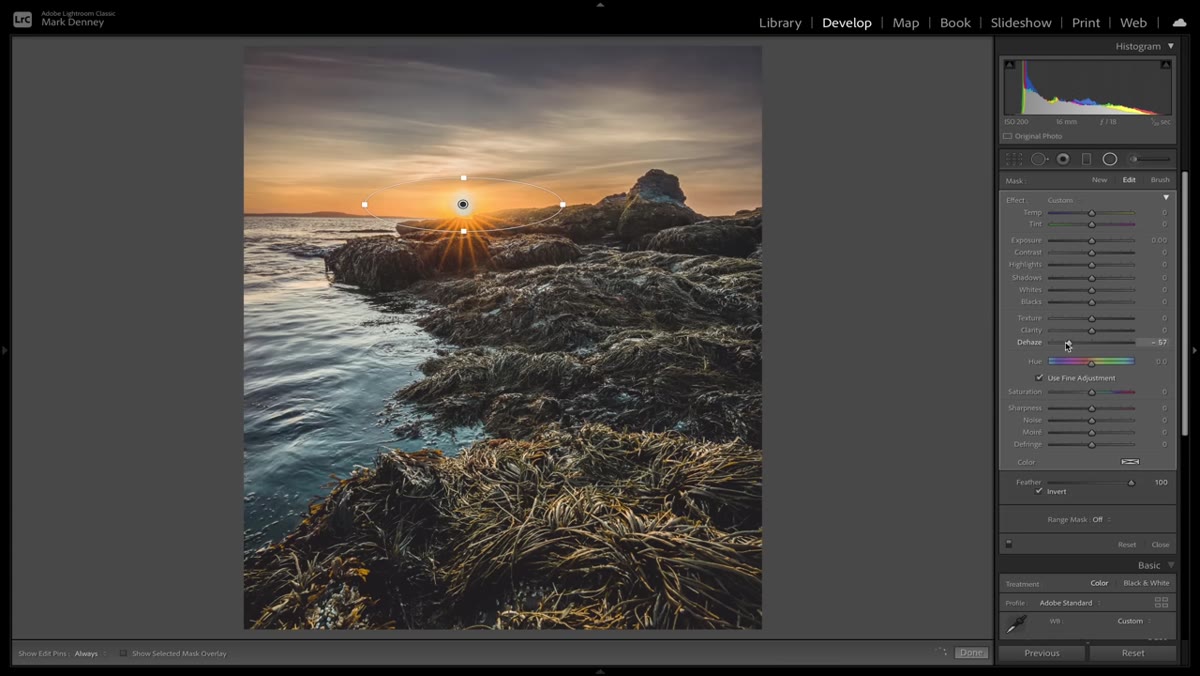 Dehaze slider pulled negative, sun softening in preview
Inside the radial filter, pull the Dehaze slider into negative territory. This is a move I don’t see talked about enough in the context of sun treatment. Most people associate Dehaze with removing atmospheric haze, pulling positive to add clarity and punch. Going negative does the opposite. It softens fine detail, adds a slight luminous quality, and allows the sun to bloom the way it actually does when you’re standing in front of it at golden hour. Watch the preview carefully as you drag. You’re not blowing the highlights back out. You’re restoring the sense that light is radiating outward rather than sitting flat against the sky.
Dehaze slider pulled negative, sun softening in preview
Inside the radial filter, pull the Dehaze slider into negative territory. This is a move I don’t see talked about enough in the context of sun treatment. Most people associate Dehaze with removing atmospheric haze, pulling positive to add clarity and punch. Going negative does the opposite. It softens fine detail, adds a slight luminous quality, and allows the sun to bloom the way it actually does when you’re standing in front of it at golden hour. Watch the preview carefully as you drag. You’re not blowing the highlights back out. You’re restoring the sense that light is radiating outward rather than sitting flat against the sky.
Step 5: Reduce Texture to Restore the Glow
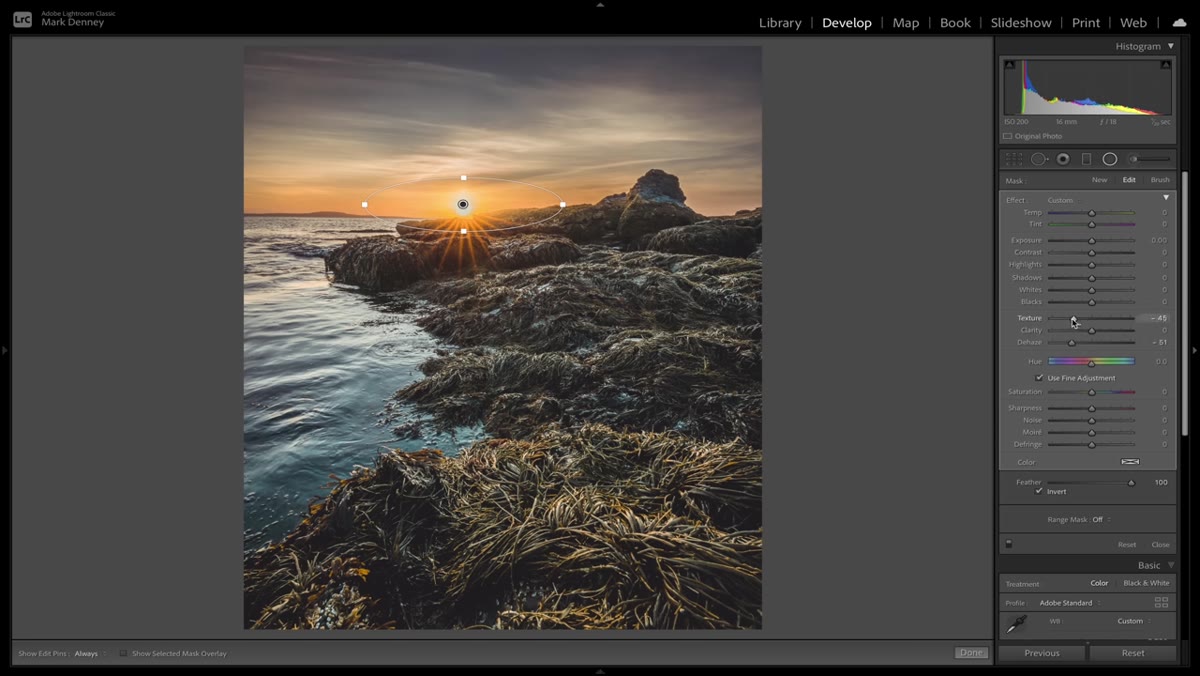 Texture slider pulled negative within radial filter adjustment
Still inside the same radial filter, bring the Texture slider down as well. Texture in Lightroom works on mid-frequency detail. Pulling it negative around a sun source reduces the granular, almost rough quality that aggressive highlight recovery can leave behind. Think about what the sun actually looks like to the naked eye. It doesn’t have texture. It has presence. You’re not adding anything here. You’re subtracting the artifact that the recovery process introduced. The combination of negative Dehaze and negative Texture is subtle but the two together produce a result that reads as natural rather than processed.
Texture slider pulled negative within radial filter adjustment
Still inside the same radial filter, bring the Texture slider down as well. Texture in Lightroom works on mid-frequency detail. Pulling it negative around a sun source reduces the granular, almost rough quality that aggressive highlight recovery can leave behind. Think about what the sun actually looks like to the naked eye. It doesn’t have texture. It has presence. You’re not adding anything here. You’re subtracting the artifact that the recovery process introduced. The combination of negative Dehaze and negative Texture is subtle but the two together produce a result that reads as natural rather than processed.
Step 6: Use Contrast to Tune the Transition Zone
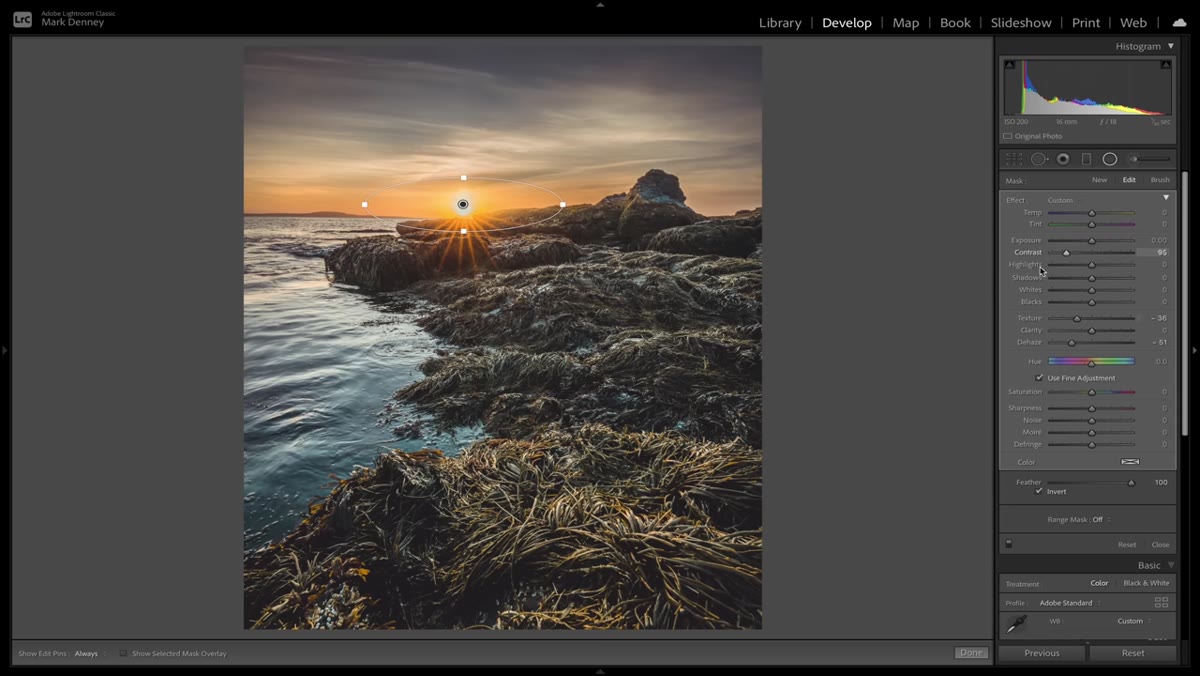 Contrast slider being adjusted inside radial filter panel
The last adjustment inside this radial filter is a small contrast tweak. Rock it slightly back and forth to see how it interacts with the edges of your correction zone. A small positive push here can help the sun feel slightly more defined against the sky without losing the glow you’ve just restored. Too much and you’re back to the problem you started with. Too little and the sun can start to look washed out at the transition edge. This is where taste takes over from technique, and there’s no single right value. What you’re calibrating is how the light feels, not how the numbers look.
Contrast slider being adjusted inside radial filter panel
The last adjustment inside this radial filter is a small contrast tweak. Rock it slightly back and forth to see how it interacts with the edges of your correction zone. A small positive push here can help the sun feel slightly more defined against the sky without losing the glow you’ve just restored. Too much and you’re back to the problem you started with. Too little and the sun can start to look washed out at the transition edge. This is where taste takes over from technique, and there’s no single right value. What you’re calibrating is how the light feels, not how the numbers look.
One Thing I’d Add From My Own Experience
The single most useful habit I’ve developed around this problem is waiting. I don’t mean waiting for the image to export. I mean closing Lightroom and coming back the next morning. I’ve woken up at 4am most of my adult life without needing an alarm, and some of the most valuable editing sessions I’ve ever had were the ones where I reopened a file I thought was finished and immediately saw it was overcranked. Fresh eyes cut through the noise that accumulates during a long session. Denney’s six signs give you a framework to apply when you return. Without a framework, you’re just hoping you’ll notice something is off. With one, you know exactly where to look.
The deepest takeaway from this tutorial is one Denney implies more than states: restraint is a skill, not a default. Over-processing doesn’t happen because photographers are careless. It happens because the tools are powerful and the feedback loop in editing software rewards intensity. Learning to recognize when detail is being rendered instead of revealed is the work that separates competent editing from editing that actually serves the image.
Watch the full tutorial on YouTube to see all six signs demonstrated with before-and-after comparisons on real landscape images.
Comments (2)
Never thought of approaching it this way. Really creative.
I've watched a dozen tutorials on this and yours is the clearest by far.
Leave a Comment